Filmora is an easy-to-use video editing software. It provides powerful tools for beginners and professionals.
Many people use it to create high-quality videos with minimal effort. Understanding how to use Filmora can help improve video editing skills.
This guide covers its features, pros and cons, and a step-by-step usage guide.
Getting Started with- How To Use Filmora!
1.1 Features of Filmora
Filmora offers many features for video editing. Some important ones include:
- Drag-and-Drop Interface – Users can add videos, images, and audio easily.
- Preset Templates – Pre-made templates save time while editing.
- Effects and Transitions – Smooth transitions and creative effects make videos engaging.
- Audio Editing – Tools for noise removal, sound effects, and voiceovers.
- Text and Titles – Animated text styles enhance storytelling.
- Green Screen – Allows background removal for professional-looking videos.
- Screen Recording – Useful for tutorials and presentations.
- Export Options – Supports multiple formats, including MP4, MOV, and GIF.
1.2 Installing Filmora
- Visit the official Filmora website.
- Download the software for Windows or Mac.
- Install it by following on-screen instructions.
- Launch the application after installation.
1.3 Importing Media Files
- Click Import Media Files Here.
- Select video, audio, or image files from your device.
- Drag files to the timeline for editing.
1.4 Basic Editing Tools
- Trimming – Cut unwanted parts by dragging the edges of a clip.
- Splitting – Use the scissor tool to divide a clip into sections.
- Merging – Drag clips together to combine them.
- Speed Control – Adjust speed for slow-motion or time-lapse effects.
- Crop and Zoom – Remove unwanted areas and focus on specific details.
1.5 Applying Effects and Transitions
- Open the Effects tab.
- Choose from filters, overlays, and color grading options.
- Drag the effect onto a clip.
- Adjust the intensity using the settings panel.
To add transitions:
- Open the Transitions tab.
- Drag a transition between two clips.
- Adjust duration and style.
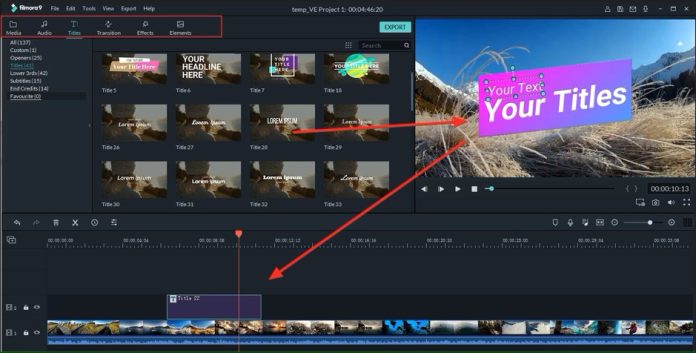
1.6 Adding Text and Titles
- Open the Text tab.
- Choose a title style.
- Drag it onto the timeline.
- Double-click to edit text, font, and animation.
1.7 Working with Audio
- Add Background Music – Import and drag audio to the timeline.
- Remove Noise – Use the audio enhancement tool.
- Adjust Volume – Lower or raise volume levels as needed.
- Add Sound Effects – Choose from built-in sound effects.
Advanced Editing and Exporting
2.1 Green Screen (Chroma Key)
- Import a video with a green background.
- Drag it onto the timeline.
- Select the video and enable Chroma Key.
- Adjust settings to remove the background.
2.2 Motion Tracking
- Select a clip in the timeline.
- Click Motion Tracking.
- Choose an object to track.
- Attach text or graphics to follow the movement.
2.3 Color Correction and Grading
- Auto Color Enhancement – Adjust brightness and contrast automatically.
- Manual Color Tuning – Customize saturation, hue, and temperature.
- LUTs (Look-Up Tables) – Apply professional color grading presets.
2.4 Screen Recording
- Click Record and choose Record PC Screen.
- Adjust settings for resolution and microphone input.
- Start recording and edit the video afterward.
2.5 Exporting Videos
- Click Export.
- Choose a format (MP4, MOV, AVI, GIF, etc.).
- Set resolution and bitrate.
- Click Export to save the final video.
Pros and Cons of Filmora
Pros-
- Easy-to-use interface.
- Large library of effects and transitions.
- Affordable pricing.
- Regular updates with new features.
- Supports multiple file formats.
Cons-
- Free version has a watermark.
- Advanced features require a paid subscription.
- Limited control over audio mixing.
FAQs
Q1. Is Filmora free to use?
Filmora offers a free version, but exported videos have a watermark. To remove it, a paid version is required.
Q2. Can I use Filmora on both Windows and Mac?
Yes, Filmora is available for both Windows and Mac.
Q3. Does Filmora support 4K video editing?
Yes, Filmora allows editing and exporting in 4K resolution.
Q4. Can I add subtitles to my videos?
Yes, Filmora includes a subtitle feature to add and customize text.
Q5. What file formats does Filmora support?
Filmora supports MP4, MOV, AVI, WMV, and GIF, among others.
Bottom Line
Filmora is an excellent video editing software for beginners and professionals. Its intuitive interface and powerful tools make video editing easy.
By following this guide, users can create high-quality videos efficiently.
Whether editing simple clips or complex projects, Filmora provides everything needed to enhance creativity.
Start using Filmora today and bring ideas to life through engaging videos.


[…] Filmora offers a green screen feature that allows users to replace backgrounds in videos. This is useful for professional editing and special effects. […]